outta the box:
This photo no guy will recognize... it's INSTRUCTIONS! LOL, i know the guys throw those out right off the bat. hahaha.
Instead of opening the bar up yet, i opened a bracket, boy is that baby a solid piece of metal. and the chroming is nice! The bracket feels like it weighs over a lb.
So, time to READ the instructions, coz that's how I roll... they shorted me 4 washers, but I've got those laying around the garage, Reading through I see they call for a 21/64" drill bit. Yes, for their 5/16" bolts. I didn't have that bit, was wondering if i could use a 3/8", but unsure if it would be too big. posted the question on the forum, got a suggestion to use the one they recommend (thanks LesterDiamond!) so ran out to Lowe's and grabbed one up. Now I needed to see just what was I up against with this drilling??? so out to the garage to pop off the seat and fender...
To take off the seat/fender
These clips come off first - they are out now they are the holes by the foot pegs. Those are clips where you push in the center and they release.
If you ride solo, don't' forget to pull out this screw... I did, and was wondering for 10 minutes why the fender wasn't popping off. LOL... Doh!
So here we are with the fender off. Looks like I've got some room in there for a FATTER tire! LOL... yes yes Mod-itis... all things in their time...
So i took a peek and OMG I am practically stopped in my tracks! Goodness gracious. they call that thing the Strut, and goodness it is thick, two layers/hollow and looks so slippery! plus it's a tiny little area. only 1 " from top to bottom. Talk about nervous! I became terrified of trying to do this. How in the world am I going to (1) drill through that metal, (2) drill the holes straight, (3) drill without slipping, (4) not pop a tire. I'm petrified. I'm glad I looked at this tonight. I posted another topic on the forum to seek shared experiences. I hope peeps respond tonight and the UK/Canada Folks in the wee hours of the US Morning.
Shoot. Hmmmm... Gotta get me some courage.!
Here's what I'm talking about "thin"
This is the template for the drilling. OMG.
Well, We'll sleep on this and get back to it in the morning...
Niters,
JDol.
SATURDAY
Well, we wrote the forum and sought suggestions and support for taking on the adventure of the day I was getting psyched up to get going on the project. SO we posted and waited, and got so many helpful suggestions/tips. i decided to get a move on and bring the party out to the garage and set up.
So we need:
Laptop (Check tips)
MacX's Install notes on Forum
Directions
Locktite
Centerpunch
Duct tape
Masking Tape
Drill/Bits
Silicone
Diet Dew
&
Devil Dogs....
So here are a few tips. Place a piece of duct tape on the strut so the drill bit doesn't wander/slip when you start it (Thanks Allan!). Use a center punch to have a starting point for drilling (Thanks TheNewAftermath). Drill pilot holes - Thanks (SinisterTurtle)...1/8"... Use a corded drill (Thanks ExRed/KIOWA). I only have a cordless, so it was suggested if the cordless didn't have enough to get the drill bit going, I could step it up to the right size by going up drill bit sizes in increments (Thanks RebelD!)....Slow drill speeds! & use cutting oil/lube. (Thanks SinisterTurtle) I found a recipe for that which is for 2 parts water, 1 part olive oil and a dash of washing liquid.
So let's begin...
Let get the center punch involved
Drilling I used 3 sizes. The Ginz bar is SAE. I had to go out and purchase the 21/64" bit for the 5/16" bolts. I had the other SAE bits already, but didn't realize until i had started that they were less than adequate, being somewhat dull. I spent about 1 1/2 hours working on drilling the pilot holes on both sides, but i was only able to break through the front of the strut. It is hollow inside and then I had to drill the back out. that was T-O-U-G-H! So while I was almost through the back side on this one side, it wasn't going, and I had to take a break...My hand hurt, and I figured I best recharge not only the drill batteries, but JDol's batteries :)
Ate lunch, checked into the forum, and resumed. Then I was cooking with gas - re-energized. Finished up the Right side rather quickly, moved over to the left, and then the bits i was using went D-U-L-L.... back to Lowe's :) I must say i learned a lot about the settings on my drill, those dials at the top labeled 1 through 19, and the high low settings... Now that I am reflecting, I suppose a corded drill would have made a difference. I think I will put that on the list of tools to get.
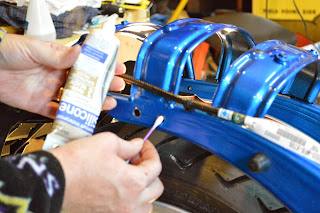
SO... we got all the holes drilled, and hoo-rah they all line up with the brackets. How's about that? :) So before we put them on, let's silicone the holes to prevent rusting. (Thanks Ken/MacX/Ginz)

We will also Lock-tite the threads for bolting. (Thanks Ken/Ginz)
So I got both brackets on each side, torqued to 175 in/lb.
Now time to get the baby on - As of yet I haven't even unwrapped it...

the fasteners for the bar, use a large hex, (SAE) so we dug this out of the 1960's bin... lol...
Anyway, we finished up the job and snapped a photo just to commemorate the achievement :)
Hopefully get more pics tomorrow or next week.
I'm exhausted!!!!!!!!!!!!!!!
Cheers!
JDol


